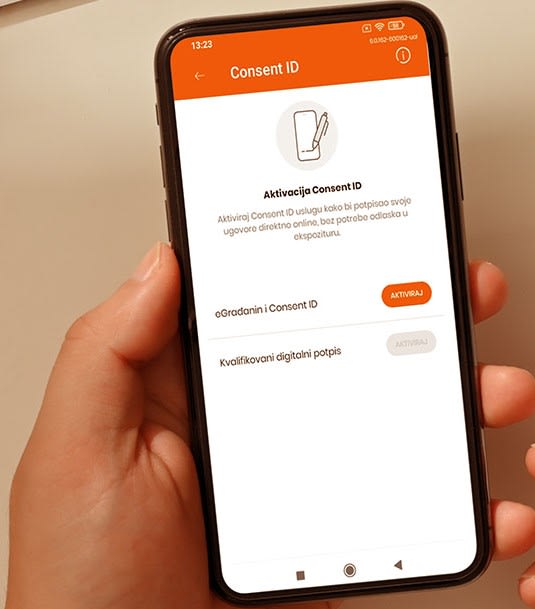
eGrađanin, ConsentID, and Qualified Electronic Certificate service activation
Now you can more quickly and easily activate the services of eGrađanin, ConsentID, and Qualified Electronic Certificate, which is a replacement for a handwritten signature allowing digital signing of documents.
You can activate these services in the Digital Banking App and you are not required to go to the bank or any of the registration authorities to get parameters.
How to get ConsentID and QES?
In collaboration with the IT Office and e-Uprava, we have enabled you to generate parameters for the ConsentID App and to generate QES in the cloud on your own, through Digital Banking (Banca Intesa Mobi and Banca Intesa Online), and so use the benefits of the most of e-Uprava services, such as property tax payment, ordering and downloading certificates and confirmations or scheduling appointments for personal document issue.
1. Creating ConsentID parameters
Step 1 – In our Intesa Mobi App, select Settings (gear icon) in the drop-down menu, then select Security, and in the end, select ConsentID.
Step 2 – Click on the Activate button in the Consent ID and eGrađanin options.
Check if the information shown is correct, confirm this information, and approve the service activation by entering the PIN you use to log in the Intesa Mobi App.
You should copy the shown user ID, as you will need it later, during the activation process.
The second part of the security code will be sent by an SMS, to increase the security level.
Pending Activation status is shown as long as the activation is not completed in the settings.
2. ConsentID App download and activation
Step 1 – Having completed these steps, you should download the ConsentID App from the Apple Store or Play Store.
Step 2 – Create a six-digit PIN to use for logging in the Consent ID App and confirm it. Two activation methods will be displayed and you should select Manually Insert Parameters.
Step 3 – Insert the User ID (information from the Banca Intesa Mobi App you have previously copied) and the ConsentID Registration Code you have previously received by an SMS.
Step 4 – Thereafter, the screen shows a form where you should insert your name, surname, User ID, and date by which the ID will be valid. After filling out these fields, “ConsentID activation successfully completed” will be shown on the screen.
After a successful ConsentID activation, return to the Intesa Mobi App.
3. QES activation
Step 1 – In the Intesa Mobi App go to the ConsentID screen (select Settings from the drop-down menu, then Security and, in the end, ConsentID) and select Activate Qualified Electronic Certificate.
Wait for a few seconds while the application redirects you to your browser.
Step 2 – eID Portal will be shown in the browser, where you should click on Mobile Phone Login option and after entering your email address, click on Log in.
Step 3 – You will receive a notification that your activation request has been received (if you do not receive the notification, you only need to re-open the ConsentID App) and you should enter the PIN you have created (six-digit PIN)
Step 4 – Access approval screen will be shown. After entering the PIN, the ConsentID App will ask you to approve access to the site. By a click on the Approve button, the access approval process will be completed.
Step 5 – Return to the eID Portal (through your browser) and create a Qualified Electronic Certificate by a click on the Issue button; a PDF document will open thereafter, whose title is: “Contract of Qualified Electronic Certificate Issue for Remote Qualified Electronic Signature,” which you approve by checking the I agree option at the bottom of the document), and your Qualified Electronic Certificate will be active in the cloud.

